Let’s clear something up right away because it trips up a LOT of new RVers. Your RV doesn’t have an “septic tank” like a house. Instead, it has an RV septic system that includes holding tanks specifically designed to store waste and wastewater.
What these holding tanks do is collect toilet waste in the black tank and wastewater from sinks and showers in the gray tank until you dump them at a dump station or full-hookup site. Unlike a traditional septic tank, which treats waste through a complex biological process, these tanks simply hold it until you’re ready to dispose of it. And once you understand how those tanks work (and why they get gross), keeping them clean gets way easier.
Let’s walk through it like we’re chatting at the campground picnic table.
This Post Is All About RV Septic Systems
RV Septic Systems (Black + Gray Tanks): What They Are and How They Actually Work
The big misconception
When people say “RV septic,” they usually mean the black tank + gray tank setup. These tanks don’t treat waste like a home septic system; they hold it. That’s it. The black tank stores toilet waste, while the gray tank collects water from sinks and showers, making them essential components of your RV’s sanitation system.
Black tank vs gray tank (and yes, both can stink)
- Black tank: Contains toilet waste, including liquids, solids, and toilet paper.
- Gray tank: Holds wastewater from sinks and showers, which may include soap scum, toothpaste, food bits, grease, and unpleasant odors associated with them.
A lot of folks assume the gray tank is “basically clean water.” Nope. Gray tanks can smell awful because food sludge and grease love to rot in warm weather.
How the system flows (simple version)
- The black tank receives fresh water and toilet flushes.
- The gray tank collects water from showers and sinks.
- Both tanks empty through the termination outlet using gate valves and a sewer hose.
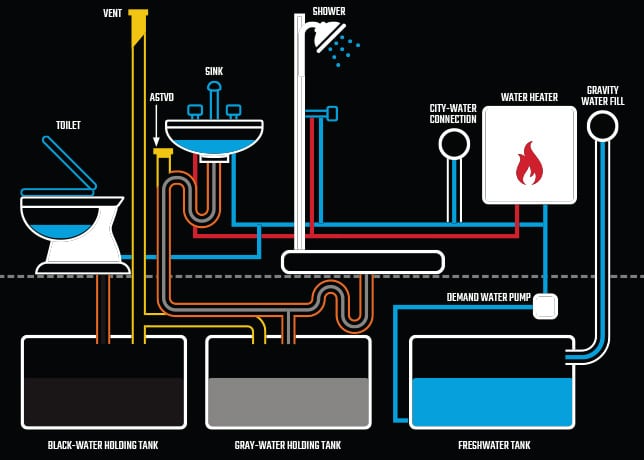
Key components you should know (because these matter for smells)
- Black tank + gray tank (holding tanks)
- Vent stack + roof vent (lets gases escape upward)
- P-traps under sinks/shower (water barrier that blocks odor)
- Gate valves (black valve + gray valve)
- Termination outlet (where you connect the sewer hose)
- Sewer hose (your dedicated “do not use for anything else” hose)
- Optional tank flush port (built-in black tank rinser on many RVs)
- Outlet sanitary tee (ensures proper waste flow and prevents clogs)
- Inlet tee (helps direct waste and reduce odor buildup)
The goal of “clean tanks” isn’t perfection. It’s:
- preventing buildup
- controlling odors
- dumping correctly
- using a consistent treatment routine
And that takes us to the real problem.
The Real Problem: Why RV Tanks Get Smelly (Even When You “Dump Regularly”)
You can dump on schedule and still have nasty odors, slow drains, and sensors that lie to you. Here’s why.
1) The dreaded “poop pyramid”
If you’ve never heard that phrase, congrats. If you have, I’m sorry.
A poop pyramid happens when solids stack up under the toilet because:
- you’re not using enough water
- you leave the black valve open at full hookups (big mistake)
- the tank dries out and waste hardens
- you’re not using a breakdown treatment consistently
Once the bottom of the tank becomes a dry, crusty base, dumping won’t remove it. You’ll get odor and “false full” readings even though you swear you emptied the tank.
2) Sludge layers and toilet paper clumps
Even if you avoid the pyramid, you can still get:
- sludge stuck on the tank floor
- paper clumps that don’t break down well
- residue that hangs up on the walls
The presence of an inlet tee can help direct waste more effectively, reducing the risk of these clumps forming and minimizing odor buildup in the process.
3) Gray tank grease + soap scum (the sneaky stink)
Gray tanks collect:
- dish soap, shampoo, body oils
- grease from cooking
- tiny food bits
That builds a film that smells sour, especially in heat.
Additionally, it’s important to understand how septic tank layers can form inside holding tanks. Unlike a home septic system, which relies on natural digestion processes to break down waste, RV holding tanks lack the necessary bacteria and environmental conditions for effective decomposition. As a result, solid waste can settle at the bottom, creating distinct layers: sludge, liquid effluent, and scum on the surface. This layering effect can lead to unpleasant odors and clogs if not properly managed.
4) Sensor fouling (the “my sensors are broken” myth)
Most of the time, sensors aren’t broken. They’re dirty.
Waste residue coats the probes, so your panel says FULL even when you just dumped. Cleaning the tank walls often fixes it.
To prevent this issue, consider using treatments that help liquefy RV tank contents. These products can assist in breaking down solids and reducing the formation of layers, ensuring that waste moves more freely and that sensors accurately reflect the tank’s level.
5) Venting + dry P-traps can amplify odor
Quick checklist:
- A blocked roof vent traps gases.
- A dry P-trap (after travel or storage) lets odors come up through the drain.
If you want cleaner tanks, you need a routine. Not random panic fixes at the dump station.
The Golden Rules to Keep RV Septic Tanks Clean (The Stuff That Prevents 90% of Issues)
If you do nothing else from this post, do THESE.
Rule 1: Use more water than you think (especially in the black tank)
Water is your best friend in the black tank. It’s what keeps waste moving instead of stacking.
What this looks like in real life:
- Add a good flush (or two) when you go #2.
- Don’t be stingy with water just to “save tank space.”
- Start trips with a few gallons already in the black tank so the bottom is never dry.
Rule 2: Keep the black valve CLOSED until it’s time to dump
Even at full hookups!
Leaving it open lets liquids drain out while solids stay behind. That’s how pyramids are born.
So yes: black valve stays CLOSED until the tank is reasonably full and ready for a strong dump. It’s generally recommended to dump your black tank every 3 to 5 days, depending on usage.
Rule 3: Consistent treatment beats emergency deodorizing
If your only plan is a scented pod when things get bad, you’ll keep fighting the same battle.
A good routine treatment helps with:
- breaking down waste and paper
- reducing odor at the source
- keeping tank walls cleaner over time
We’ll talk about where Liquified RV Tank Treatment fits in a bit.
Rule 4: Don’t pour grease, coffee grounds, or food sludge down drains
Gray tank gunk is real. Help yourself out:
- Use sink strainers
- Wipe oily pans with a paper towel before washing
- Dump leftover soup and food bits in the trash, not the sink
Rule 5: Keep P-traps wet
After travel or storage, traps can slosh dry.
Do this:
- Run a little water down each drain (kitchen, bathroom sink, shower)
- If you’re storing the RV, check them occasionally
This is a simple, sneaky fix that stops a lot of “mystery smells.”
How to Dump Your RV Tanks the Right Way (Step-by-Step, No Mess)
Dumping doesn’t have to be stressful. It just needs a repeatable order.
Safety + setup
- Wear disposable gloves (or dedicated reusable ones)
- Use a dedicated sewer hose
- Make sure connections are tight (use a clear elbow if you want to see flow)
- Follow posted dump station rules
Best Practices for Emptying RV Tanks Safely:
- Dump the black tank first to prevent contamination.
- Always ensure the dump station is equipped and functioning properly before arrival.
- Sewage treatment chemicals should be added after dumping to maintain tank health.
- Rinse the black tank thoroughly after emptying to remove residue.
- Monitor tank levels regularly; don’t wait until they’re completely full.
- If possible, dump gray water after black water to help clean the hose.
- Wash your hands thoroughly after completing the process, even with gloves on.
Step-by-step dumping
- Connect the sewer hose to your RV termination outlet and the dump inlet.
- Check the slope so waste flows downhill (no low spots that trap “stuff”).
- Pull the black valve first. Let it fully drain.
- If you have a built-in flush port, rinse the black tank (more on deep cleaning below).
- Close the black valve.
- Pull the gray valve next. This helps rinse the hose with soapy water.
- Close the gray valve.
- Disconnect, rinse the hose (if the station has a rinse spigot meant for that), cap everything, and store your hose.
The step most people skip (and regret later)
After dumping, add water back into the black tank. A few gallons is perfect.
This prevents solids from landing on a dry tank bottom the next time you use the toilet.
Common mistakes to avoid
- Partial dumps (weak flow leaves solids behind)
- Leaving the black valve open at hookups
- Not adding water back after dumping
- Ignoring small leaks around fittings and caps
Deep Cleaning Your RV Septic System (When It’s Already Nasty)
Sometimes the tank is past “basic maintenance.” You’ll know you need a deeper clean if you have:
- persistent odor even after dumping
- sensors that always read wrong
- slow draining
- visible chunks during dumping
- a long storage period where stuff dried out
Mechanical rinse approach: fill and dump cycles
This is boring but effective:
- Dump normally.
- Add water to the black tank (via toilet or flush port).
- Drive a bit if possible (agitation helps).
- Dump again.
- Repeat until it runs cleaner.
If you have a built-in black tank flush, use it. If not, some people use a rinse wand through the toilet. Just be careful and don’t spray blindly.
Gray tank cleanup
Gray tanks love hot water:
- Periodically run hot water down the kitchen drain while the gray valve is closed.
- Keep using strainers.
- Avoid grease whenever you can.
Sensor recovery (aka stop blaming the sensors)
Dirty walls cause dirty probes. Cleaning the tank usually improves readings over time.
What to avoid (seriously)
- Bleach bombs
- Caustic drain cleaners
- Anything not labeled safe for RV holding tanks
These can damage seals and valves, and they can also be rough on campground septic systems. Harsh chemicals may disrupt the natural balance of bacteria essential for breaking down waste in home septic systems or campground drain fields, leading to costly repairs and environmental harm.
Cold Weather, Long Storage, and Full-Time RVing: How Your Routine Should Change
Your tank routine shouldn’t be identical in every season and travel style.
Cold weather
Freezing is a real risk for:
- gate valves
- hoses
- tank contents
Basics:
- Don’t leave water sitting in exposed hoses.
- Keep your dump hose stored and only connect when dumping.
- Use proper winterizing practices for your setup (heated underbelly, insulation, etc.).
Long storage
Before storage:
- Dump and rinse.
- Leave tanks empty, but don’t leave the black tank bone-dry inside if your approach/product directions recommend adding a bit of water.
Also, remember the P-traps. A quick splash of water in each drain helps block odors.
Full-time RVing
You’re using the system constantly, so you need consistency:
- Dump on a predictable schedule (often when tanks hit about 2/3).
- Keep black valve closed.
- Use treatment regularly.
- Do a deeper rinse/soak periodically.
Boondocking
You can conserve water WITHOUT creating a pyramid.
A good compromise:
- Use “minimum water,” not “no water.”
- Start with water in the black tank.
- Give solids enough water to move and break down.
High-heat climates
Heat speeds up odor and bacterial activity. In summer, venting and consistent treatment matter more.
Where Liquified RV Tank Treatment Fits In (And How to Use It for Best Results)
This is where a lot of RVers finally get ahead of the stink instead of reacting to it.
Liquified RV Tank Treatment is most helpful as a routine, after-dump habit. The point is not to mask odors with perfume. It’s to support:
- waste and toilet paper breakdown
- odor reduction between dumps
- less residue sticking to walls over time (which can also help sensors behave better)
When to use it
- After every dump (best habit): add the recommended dose + water into the black tank.
- Before travel days: driving agitates the tank and helps things mix.
- During hot weather or heavy usage: consistency matters more when the system is working harder.
What results to expect (realistic and honest)
With regular use, most people notice:
- less odor between dumps
- smoother dumping with less “left behind”
- fewer sludge and residue issues over time
- fewer sensor “false full” problems as walls stay cleaner
Treatment vs “masking deodorants”
Masking products try to cover smell.
A breakdown-focused routine is prevention. That’s the whole game.
Note: When choosing treatments, ensure they are safe for both RV holding tanks and home/campground septic systems to prevent damage.
Compatibility note
Always follow the label directions exactly and only use products that are RV holding-tank safe.
If you want to add Liquified RV Tank Treatment to your routine, keep it simple: dump, add water, dose the tank. Done.
Special Offer: Save 15% on Your First Order!
Ready for cleaner tanks, fewer smells, and less stress at the dump station? Click here to order Liquified RV Tank Treatment and use my exclusive promo code ROCKIES15 at checkout—get 15% off your first order! This discount is just for readers like you looking for an easy upgrade to their RV maintenance routine.
A Simple Weekly RV Tank Maintenance Routine (Easy Enough to Actually Stick To)
Let’s make this practical. Here are routines that actually work in the real world. These routines are essential for effective RV holding tank maintenance.
If you’re a weekender
- Before the trip: add a few gallons of water to the black tank.
- After first toilet use: add your normal treatment routine.
- End of trip: dump black then gray.
- After dumping: add water back + Liquified RV Tank Treatment so the tank never starts dry.
If you’re traveling (moving often)
- Dump when tanks hit about 2/3 full.
- Always black first, gray second.
- Quick rinse if possible.
- After dumping: add water + treatment.
- Keep valves closed.
If you’re a full-timer
- Weekly: quick sniff test (yep), check drain speed, check for weird gurgles.
- Monthly: do a deeper rinse/fill-and-dump.
- Always: strainers in sinks, no grease down drains, and consistent treatment.
Quick checks that prevent “surprise gross”
- Roof vent clear (leaves, debris, wasp nests happen!)
- P-traps have water
- No valve seepage at termination outlet
- Sewer hose in good shape (no cracks, soft spots, or pinholes)
- Termination cap seal not dried out
Consistency is what keeps dump day boring. And boring is GOOD.
Let’s Wrap Up: Clean Tanks, Fewer Smells, and Less Stress at the Dump Station
If we had to boil this whole thing down, it’s this:
- Use more water in the black tank
- Keep the black valve CLOSED until dumping
- Dump correctly (black first, gray second)
- Do occasional deep cleaning when needed
- Use a consistent tank treatment routine
Those small habits prevent the big nasty problems: pyramids, sludge layers, and sensors that swear your tank is full forever.
If you want an easy upgrade to your routine, don’t forget—order Liquified RV Tank Treatment here and use promo code ROCKIES15 for 15% off your first order! One small step for your tanks; one giant leap for stink-free camping.
Your RV tanks don’t need to be perfect. Just maintained.
FAQs (Frequently Asked Questions)
Does an RV have a septic tank like a house?
No, RVs don’t have septic tanks like houses. Instead, they have holding tanks—specifically black and gray tanks—that store waste and wastewater until you dump them at designated stations.
What is the difference between the black tank and the gray tank in an RV?
The black tank holds toilet waste, including liquids, solids, and toilet paper. The gray tank collects wastewater from sinks and showers, which contains soap scum, toothpaste, food bits, grease, and can also produce unpleasant odors.
Is it safe to dump RV tanks into a home septic system?
Dumping RV tanks into a home septic system can be safe if done correctly, but there are potential risks:
- Overloading: RV waste is more concentrated than household waste. Dumping too much at once can overwhelm the system.
- Chemicals: Some tank treatments contain harsh chemicals that can disrupt the bacterial balance in the septic system.
- Solid waste: Ensure that only liquefied waste enters the system to prevent clogs.
Best practices include:
- Dilute waste with water before dumping.
- Avoid dumping if the septic system is already experiencing issues.
- Use biodegradable tank treatments.
Always check local regulations as well; some areas prohibit this practice altogether.
Why do RV holding tanks sometimes smell bad even when dumped regularly?
Odors can result from issues like the ‘poop pyramid’ where solids build up due to insufficient water use or leaving the black valve open; sludge and toilet paper clumps sticking to tank walls; grease and soap scum buildup in the gray tank; dirty sensors giving false full readings; and blocked vents or dry P-traps allowing odors to escape.
How should I manage the black tank valve during my RV trip?
Keep the black tank valve closed until it’s time to dump. Leaving it open, even at full hookups, allows liquids to drain while solids stay behind, causing buildup and odors known as ‘poop pyramids.’ This practice helps prevent blockages and foul smells.
What are some key components of an RV’s waste system that affect odors?
Key components include the black and gray holding tanks, vent stack and roof vent for gas escape, P-traps under sinks/showers that block odors with water barriers, gate valves controlling flow, termination outlet for sewer hose connection, sewer hose dedicated for waste dumping, and optional tank flush ports for cleaning.
What are the best practices to keep RV septic tanks clean and odor-free?
- Use plenty of water especially in the black tank to keep waste moving
- Keep the black valve closed until dumping time
- Maintain a consistent treatment routine to break down waste
- Regularly clean tanks to prevent residue buildup
- Ensure vents are clear and P-traps remain filled with water
- Dump tanks properly at designated stations
How does an RV septic system differ from a home septic tank?
An RV septic system differs from a home septic tank in several ways:
- Function: RV septic systems are designed for temporary waste storage while traveling, whereas home septic tanks manage waste long-term.
- Layers: Home septic systems typically consist of multiple layers including a settling chamber, drainage field, and soil filtration. RV systems usually have simpler designs with just holding tanks that require regular dumping at designated stations.
- Water usage: RV systems rely on specific water levels to function properly (e.g., filling the black tank with enough liquid), while home systems use consistent household water flow for effective operation.
Understanding these differences is crucial for proper maintenance and odor management in both types of systems.
Leave a Reply